Widgets
What is a widget?
Building widgets is super easy on the Share Link platform, but first, what is a widget I hear you say?
A widget is simply a component you build using our application that you are able to then display on your website. This could be a share price box, a historical pricing graph, a list of company announcement or more.
We have a library of available widgets which can be fully customised to match the branding and feel of your website.
You will only see the widgets available based on the level of your plan.
Accessing the Widget Library
To access the widget library, from your dashboard select the widgets button on the main menu on the left and click + create widget
Selecting A Template
The next step to creating a widget is to select the type of widget you wish to create. You can browse through the list of templates or type in the search bar to narrow down the list. Once you find the style of widget you wish to create, simply click on it to select it.
Styling Widgets
Once you have selected the kind of widget you want to build, you can style the look by editing the widget options on the left side of the page. A live preview of the widget you are building is displayed on the right hand side of the page (with test data until you finalise the widget build).
When you change one of the settings, Share Link will automatically refresh the live preview to show you what the changes look like.
Once you are happy with the styling of your widget, click save widget.
Customising Widgets
You can further customise each widget by using the Customise tab in the widget options.
Customisation options exist for colours, fonts, pagination, date range and multiple other options.
Each time you change a customisable field, Share Link will automatically refresh the live preview to show you what the changes look like.
Once you are happy with the customisation of your widget, click save widget.
Editing Widgets
All created widgets are able to be edited at any time. To edit a widget, select it from the menu on the left:
Once you have selected the widget, scroll down to the bottom of the page and select edit widget.
Once you have the widget open for editing, you can customise the widget further and save when the changes are complete.
Embedding Widgets Into Your Website
Adding a Share Link widget to your website is known as "embedding". If you are familiar with adding youTube videos to your website, the process is the same.
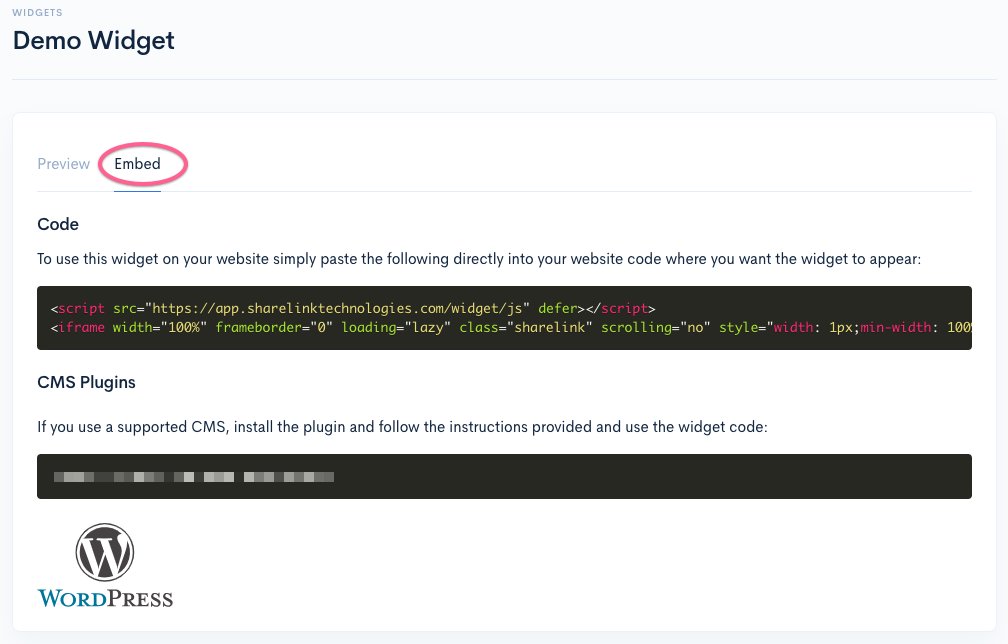
Select a widget you have created from the main menu and click the "Embed" tab from the preview page. This will show you the different options for placing the widget in your site.

If you are using Wordpress as your CMS we recommend using the Share Link Wordpress plugin which you can download here and contains further instructions on embedding widgets into your site easily via the Wordpress admin.
Otherwise you can copy and paste the code in the Code field directly into your website code or CMS - instructions for doing this will vary from system to system but if you are not familiar with this process try looking for instructions on embedding youTube videos for your CMS or alternatively contact Share Link support and we will assist you.
And that's it! Your share link widget should now be displayed on your website.
If you are having issues displaying your widget please check that your website domain is registered in the domain area of your account settings.
WIX users
Wix assigns a number of different domains to your account that needed to be added to the Configuration > Domains section of the Share Link admin before the domains will work. There are 2 separate domains for working in the preview/editor and one for production. To retrieve these domains:
1) Follow the above embed instructions and embed the widget as HTML into your Wix page and click preview. 2) The widget will display an error message containing a website address (URL) copy this address into the domain page of Share Link admin 3) Publish the page to your live site and visit the page. 4) Find the widget and it will display the same error message but with a different URL. Copy this URL into another of the domain fields in Share Link admin. 5) Click save. You should now be able to refresh/reload your website page and see your Share Link widgets.
Technical Notes for Web Designers and Developers
Share Link widgets use an iframe to embed widgets into a website. The frame's width is set to always be 100% while the height is dynamic and will change to fit the content of the widget. This allows for responsive widgets that you can control the placement of.
Some tips for placing your widgets
1) Create a bounding element (such as a div) and apply your width, break points etc. to that div and place the widget code inside. This will allow for a responsive widget. Make sure the width of the element suits the content of the type of widget so you are not forcing it to mobile version unnecessarily.
2) Do not set a height for your bounding element. The Share Link widget will automatically alter its height based on the dynamic content inside it so any height restrictions will result in content being hidden.